This site is the archived OWASP Foundation Wiki and is no longer accepting Account Requests.
To view the new OWASP Foundation website, please visit https://owasp.org
OWASP Hatkit Proxy Project
| |
|
|---|---|

|
Main
The Hatkit Proxy is an intercepting http/tcp proxy which is based on the Owasp Proxy. It has a sister-project, which is the Hatkit Datafiddler
Background
The primary purpose of the Hatkit Proxy is to create a minimal, lightweight proxy which stores traffic into an offline storage where further analysis can be performed, i.e. all kinds of analysis which is currently implemented by the proxies themselves (webscarab/burp/paros etc).
Also, since the http traffic is stored in a MongoDB, the traffic is stored at an object-level, retaining the structure of the parsed traffic.
Hatkit proxy features
The additions which have been implemented on top of Owasp Proxy are:
- Swing-based UI,
- Interception capabilities with manual edit, both for TCP and HTTP traffic,
- Syntax highlightning (html/form-data/http) based on JFlex,(See tab)
- Storage of http traffic into MongoDB database, (See tab)
- Possibilities to intercept in Fully Qualified mode (like all other http-proxies) OR Non-fully qualified mode. The latter means that interception is performed *after* the host has been parsed, thereby enabling the user to submit non-valid http content.
- A set of filters to either ignore or process traffic which is routed to the proxy. The 'ignored' traffic will be streamed to the endpoint with minimal impact on performance.
Getting started
To use the proxy, download the zip-file which can be found on BitBucket download page (you can also use the direct-link on the release-page).
$ wget https://bitbucket.org/holiman/hatkit-proxy/downloads/hatkit_proxy-0.5.1.zip
$ unzip hatkit_proxy-0.5.1.zip
$ hatkit_proxy-0.5.1/hatkit_proxy.sh
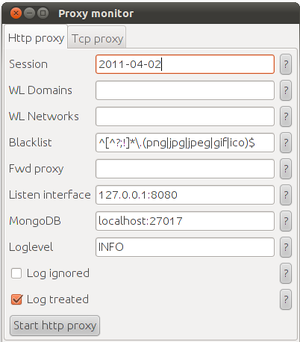
The proxy window should now pop up. Before the proxy actually starts, you need to make some settings. It has one tab for HTTP-proxy mode, and another for TCP-proxy mode.
Note:The Hatkit proxy makes use of Whitelists and blacklists, which determine what traffic is actually processed (parsed and stored) by the proxy. Requests which do not pass are streamed with minimal processing to the target host, and the proxy does not store any information about them. If you use white/black-lists, you should not need to use foxyproxy or similar tools. The blacklist is applied after the whitelist. These settings are available:
| |
Settings:
|
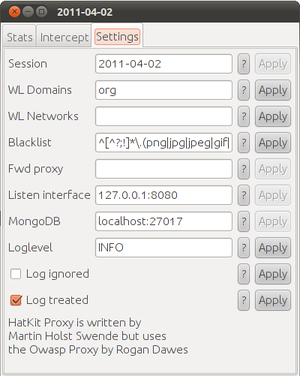
These are all documented within the application, if you click the ?-button, you will see more information about the setting in question. Tip: Most of these settings can be modified later, so you don't have to restart the proxy to e.g. redefine the filters determining what is captured and what is ignored.
In order to actually store traffic, you also need to install mongodb. Please see MongoDB for suitable version for your platform. Note: MongoDB is usually also available through Linux packet managers, if you want to do it the simple way:
sudo apt-get install mongodb
Running the proxy (HTTP mode)
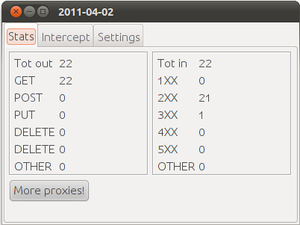
| The stats-pane contains some basic counters to show what is happening. One implementation detail in the proxy is that it should not increase it's resource consumption by e.g. generating sitemaps. The only statistics measured are counters on the different request verbs and the response status codes. | |
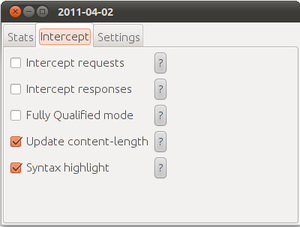
| The intercept-pane is where you select to start intercepting data, control whether you want syntax highlightning and if you want to do it in FQ or NFQ mode.
When the browser sends a request to a proxy, the request is fully qualified, i.e the first line looks something like this: GET HTTPS://foo.com:80/gazonk?a=b HTTP/1.1 The proxy then normally parses the requestline into (host, port, isSsl, URI) and connects to the specified host:port possibly using ssl. It then sends a NFQ request, which in this case would look like this: "GET /gazonk?a=b HTTP/1.1" In most other proxies, the interception is made *before* the proxy parses the browser request, so the user is always in FQ mode. With HatKit proxy, you can edit the request in NFQ mode if you want. These are the basic differences: FQ mode:
NFQ mode:
| |
| All settings where the 'Apply'-button is enabled can be modified on-the-fly |
Running the proxy (TCP mode)
Todo.
Issues
There is an issue tracker at BitBucket
Known issues :
- HTTP-intercept: Some button/checkboxes in the interception window does not work
- TCP-intercept: The statistics counters are incorrect.
Roadmap
OWASP_Hatkit_Proxy_Project/Roadmap
Storage
The Hatkit Proxy is a 'recorder' which (optionally) records http traffic into a MongoDB database. MongoDB is a document-oriented database, part of a group of databases also coined "NoSql" since they do not implement SQL.
NoSQL type datastorage is usually associated with massively parallel distributed systems with high requirements on scaleability. However, for Hatkit project, MongoDB was chosen for different reasons, since there are advantages to using it when storing data which fits the dynamic (schemaless) model. Having no schema enforced by the database does not imply that the database is just a disk-based hash table with unstructured data content. Instead, it can be argued that many NoSQL solutions are a lot like the (currently out-of-fashion) object databases, with the difference that they have more generic API's (json/bson/http) which does not bind the data to any particular framwork, application-specific classes or programming language. Certain kinds of data fit very well into these models.
Http traffic is very dynamic. Some requests are basically "GET / HTTP/1.1" while others contain forms or json and lots and a multitude of headers. Using MongoDB, it is possible to represent the data more at an object-level, e.g.
{ request:
    { method: "GET",
    headers:{ Content-Length: 1233, Host : "foobar.com", Foo: "bar"}
    parameters: {gaz: "onk"}
                    },
    response : {...}
}
Another reason, beside being very dynamic, why a non-relational database was chosen, is that http traffic was perceived as being pretty much non-relational. Each HTTP dialogue is stored as an object with no foreign keys or relation to any other database objects.
This object representation of a http dialogue allows for different requests/responses to contain different amounts of information. For example, it would be possible (but perhaps not desirable) to store the entire html response as a DOM model, which would allow database queries on html tags and attributes. MongoDB has very powerful querying-facilities. Since each object is stored with this structure in the database, it is possible to reach into objects during queries and perform e.g these kind of queries:
- "give me response.body where request.parameters.filename exists", or
- "give me request.body.parameters where
- request.body.parameters.__viewstate does not exist"
It is also possible to create javascript selection filters which are evaluated within the database. Such functionality can e.g be used to perform evaluations using JavaScript to investigate characteristics on the response html source code.
Also, MongoDB has very powerful aggregation mechanisms, where queries like the following can be used:
- "Organized by request.headers.host give me all unique parameter names.",
- "Organized by request.url.path, give me all unique response header keys".
The functionality described above is implemented within the sister project Hatkit Datafiddler.
Storage example
This is an example of using the mongo console to check one HTTP dialogue requesting http://www.owasp.org (some binary fields where the unparsed data is stored have been shortened for brevity)
> use 2011-04-02
switched to db 2011-04-02
> db.conversations.findOne()
{
	"_id" : ObjectId("4d978cf9bc3e4e2a391f27db"),
	"request" : {
		"ssl" : false,
		"target" : "www.owasp.org/216.48.3.18:80",
		"time" : NumberLong( 1.30178e+12 ),
		"raw-header" : BinData(2,...),
		"raw-content" : null,
		"headers" : {
			"Host" : "www.owasp.org",
			"User-Agent" : "Mozilla/5.0 (X11; U; Linux x86_64; en-US; rv:1.9.2.16) Gecko/20110323 Ubuntu/10.10 (maverick) Firefox/3.6.16",
			"Accept" : "text/html,application/xhtml+xml,application/xml;q=0.9,*/*;q=0.8",
			"Accept-Language" : "en-us,en;q=0.5",
			"Accept-Encoding" : "gzip,deflate",
			"Accept-Charset" : "ISO-8859-1,utf-8;q=0.7,*;q=0.7",
			"Keep-Alive" : "115",
			"Proxy-Connection" : "keep-alive",
			"Cookie" : "__utma=77342603.1836101885.1265119674.1287038519.1289393382.114; __utmz=77342603.1289393382.114.78.utmcsr=google|utmccn=(organic)|utmcmd=organic|utmctr=appsec%20research%202010%20polyglot; OAID=16f7cd90d05cc276281dde4e3df2d56c"
		},
		"rawdata" : BinData(2,"AAAAAA=="),
		"data" : {

		},
		"method" : "GET",
		"startline" : "GET / HTTP/1.1",
		"url" : {
			"raw" : "/",
			"path" : "/"
		}
	},
	"request-raw" : {
		"header" : BinData(2,...),
		"content" : null
	},
	"response" : {
		"rtt" : NumberLong( 1160 ),
		"raw" : BinData(2,"AAAAAA=="),
		"status" : "301",
		"reason" : "Moved Permanently",
		"version" : "HTTP/1.1",
		"startline" : "HTTP/1.1 301 Moved Permanently",
		"headers" : {
			"Date" : "Sat, 02 Apr 2011 20:54:18 GMT",
			"Server" : "Apache/2.2.17 (Fedora)",
			"X-Powered-By" : "PHP/5.3.5",
			"Vary" : "Accept-Encoding,Cookie",
			"Expires" : "Thu, 01 Jan 1970 00:00:00 GMT",
			"Cache-Control" : "private, must-revalidate, max-age=0",
			"Last-Modified" : "Sat, 02 Apr 2011 20:54:18 GMT",
			"Location" : "http://www.owasp.org/index.php/Main_Page",
			"Content-Encoding" : "gzip",
			"Content-Length" : "26",
			"Content-Type" : "text/html; charset=utf-8"
		}
	},
	"response-raw" : {
		"headers" : BinData(2,...),
		"content" : BinData(2,"GgAAAB+LCAAAAAAAAAMCAAAA//8DAAAAAAAAAAAA")
	}
 }
Hatkit Highlighter
Hatkit Highlighter was initially part of the Hatkit Proxy. It is a syntax highlightning-library that was separated in order for other projects to be able to use it aswell.
All language definitions are written in jflex-syntax, similar to flex, and jflex generates lexers from those definitions. The highlighter is based on another open source highlighter which has been pretty heavily modified.
Implementing support for other languages and syntaxes is a matter of writing a flex (jflex) definition - the rest is boilerplate.
Usage
It is pretty simple to embed in your application. You just need to instantiate a HighlightedDocument and let it know what type of content to expect. Example from Hatkit Proxy, HttpInterceptorUI.java:
		JTextPane rawTextRequest = new JTextPane();
		JTextPane rawTextResponse = new JTextPane();

		if (this.useSyntaxHighlight) {
			HighlightedDocument hdReq = new HighlightedDocument(
					SyntaxType.HTTPREQ_2PHASE);
			HighlightedDocument hdRes = new HighlightedDocument(
					SyntaxType.HTTPRES_2PHASE);
			rawTextRequest.setDocument(hdReq);
			rawTextResponse.setDocument(hdRes);
		}
Get it
The source is hosted at BitBucket
- Get the source:
hg clone https://bitbucket.org/holiman/hatkit-highlighter - Get the jar: download section
- There is also an issue tracker
Project About
| PROJECT INFO What does this OWASP project offer you? |
RELEASE(S) INFO What releases are available for this project? | |||||||||||||||||||||||||||||||||||||||||||||
|---|---|---|---|---|---|---|---|---|---|---|---|---|---|---|---|---|---|---|---|---|---|---|---|---|---|---|---|---|---|---|---|---|---|---|---|---|---|---|---|---|---|---|---|---|---|---|
|
| |||||||||||||||||||||||||||||||||||||||||||||


