This site is the archived OWASP Foundation Wiki and is no longer accepting Account Requests.
To view the new OWASP Foundation website, please visit https://owasp.org
Difference between revisions of "OWASP Hatkit Datafiddler Project"
| (21 intermediate revisions by 2 users not shown) | |||
| Line 1: | Line 1: | ||
| + | {| | ||
| + | |- | ||
| + | ! width="700" align="center" | <br> | ||
| + | ! width="500" align="center" | <br> | ||
| + | |- | ||
| + | | align="right" | [[Image:OWASP Inactive Banner.jpg|800px| link=https://www.owasp.org/index.php/OWASP_Project_Stages#tab=Inactive_Projects]] | ||
| + | | align="right" | | ||
| + | |||
| + | |} | ||
==== Main ==== | ==== Main ==== | ||
[[File:hatkit-datafiddler-logo.png]] | [[File:hatkit-datafiddler-logo.png]] | ||
| Line 8: | Line 17: | ||
== Getting started == | == Getting started == | ||
| + | First of all, visit [https://bitbucket.org/holiman/hatkit-datafiddler/downloads BitBucket download page] to check which is the latest release. Then get it: | ||
| + | <pre> | ||
| + | $ wget https://bitbucket.org/holiman/hatkit-datafiddler/downloads/hatkit_datafiddler-0.5.0.zip | ||
| + | $ unzip hatkit_datafiddler-0.5.0.zip | ||
| + | $ cd hatkit_datafiddler-0.5.0/ | ||
| + | $ python datafiddler.py | ||
| + | </pre> | ||
| + | Datafiddler will tell you about any missing dependencies with something like this: | ||
| + | <pre> | ||
| + | Unfortunately, you have the following missing dependencies: | ||
| + | * python-qt4 : Python bindings for Qt4 | ||
| + | * pymongo : Python drivers for MongoDB | ||
| + | </pre> | ||
| + | Fetch them via your favourite package manager (on *nix systems. Windows is currently not endorsed). Naturally, you need a '''MongoDB''' also. MongoDB is available either from the package repositories or from [http://www.mongodb.org/downloads MongoDB download section]. | ||
| + | |||
| + | If all goes well, you should be met by this screen, where you can choose which ''session'' to use. Sessions are really just databases, but Datafiddler only lists the databases in your MongoDB which contain a <code>collection</code> called <code>conversations</code>. | ||
| + | |||
| + | [[Image:hatkit-datafiddler-startup.png]] | ||
| + | ==== Table view ==== | ||
| + | [[Image:hatkit-datafiddler.png|thumb|An example of how the table view window can look]] | ||
| + | [[Image:hatkit-datafiddler-2.png|thumb|Via Settings, you can access the table definitions]] | ||
| + | [[Image:hatkit-datafiddler-tabledata-settings-1.png|thumb|Another example, using a raw python expression in the definition for column 3 and "Python" as column title]] | ||
| + | [[Image:hatkit-datafiddler-tabledata-settings-2.png|thumb|The tabledata settings also has filters]] | ||
| + | [[Image:hatkit-datafiddler-tabledata-settings-3.png|thumb|The filters can be arbitrary javascript expressions]] | ||
| + | |||
| + | The table view displays data in a 1:1 mapping, where every line in a table corresponds to one 'object' in the database. One 'object' contains the request, the response and some extra data. What is special about the Datafiddler is that what you see here is fully customizable. | ||
| + | |||
| + | == Settings == | ||
| + | If you select Settings, you will be met by the settings-window. This window gives you tools to define what is displayed in the table view to suit your current task. | ||
| + | |||
| + | <blockquote>The section below is pretty technical. You don't '''have''' to know python or javascript to use this tool, Datafiddler comes with predefined expressions and views that you can use. When you learn the ropes a bit, you can just make modifications to these and you should be fine. </blockquote> | ||
| + | |||
| + | On the left side, there are '''variables'''. For each object which is fetched from the database, these expressions determines exactly what parts are fetched and places these parts, into python variables with the names '''v0''' and onward. On the right side, there are the actual definitions of the columns that are shown in the table. These column definitions are python expressions which are evaluated at display-time, and are therefore able to either display a variable directly or perform operations on them and display the result. | ||
| + | |||
| + | For example, a database object stored by Hatkit Proxy always contain these fields: | ||
| + | <pre> | ||
| + | request | ||
| + | response | ||
| + | </pre> | ||
| + | (For more details about storage format, see [[OWASP_Hatkit_Proxy_Project#tab=Storage Storage]] | ||
| + | If the '''request''' part of a database object is loaded into '''v0''', it means that '''v0''' will contain python dictionary containing everything that concerns the request. E.g. The python expression <code>v0['method']</code> will be the request verb (GET/POST/FOO),while the expression <code>v0['headers']</code> will be another python dictionary containing the request headers. | ||
| + | |||
| + | This means that this object introspection can be performed '''either''' inside the database - which is using javascript, '''or''' in the application itself, using python. Example: | ||
| + | <pre> | ||
| + | v0 = request.headers.Host ==> v0 : "foobar.com" | ||
| + | v0 = request ==> v0['headers']['Host'] : "foobar.com" | ||
| + | </pre> | ||
| + | |||
| + | Worth mentioning though, is that accessing a non-existant attribute (or member) in javascripts returns undefined: | ||
| + | <pre> | ||
| + | var x = {}; | ||
| + | alert(x.foo); // alerts "undefined" | ||
| + | alert(x.foo.bar); // yields exception | ||
| + | </pre> | ||
| + | While in python, a similar operation yields exception sooner: | ||
| + | <pre> | ||
| + | >>> x={} | ||
| + | >>> x["foo"] | ||
| + | Traceback (most recent call last): | ||
| + | File "<stdin>", line 1, in <module> | ||
| + | KeyError: 'foo' | ||
| + | </pre> | ||
| + | Also, it makes sense to fetch only what is required for the kind of view that you are interested in. If you are analysing session tokens, it is less resource intensive on your machine not to fetch the html content of each response. | ||
| + | |||
| + | == What to show: Database Filtering == | ||
| + | Please see the tab called "Database Filtering". | ||
| + | |||
| + | == How to show it == | ||
| + | |||
| + | === Transformers === | ||
| + | Once objects or part of objects have been loaded into variables <pre>v1 ... vn</pre>, it is possible to perform operations on these objects using python. It is possible to use arbitrary python statemenets, but a set of so called 'transformers' are implemented specifically for the purpose of analysing http traffic: | ||
| + | |||
| + | {| border='1' | ||
| + | |dictToString(val) | ||
| + | |Flattens a dictionary to url-like string. <br/> Example: dictToString({'x':'y', 'foo':'bar'}) => x=y&foo=bar<br/> | ||
| + | |- | ||
| + | |cookies(request) | ||
| + | |Shows cookies<br/> @param request: either request object or request.headers<br/> | ||
| + | |- | ||
| + | |longdate(time) | ||
| + | |Returns the date on a longer format (YYYY MM DD HH:MM:SS)<br/> @param time The timestamp from the request | ||
| + | |- | ||
| + | |getheader(o,header) | ||
| + | |Gets a header value from either a response object,response.headers object, request object or request.headers object. <br/> @return the header value or None | ||
| + | |- | ||
| + | |toupper(val) | ||
| + | |Dummy example transform: makes the input into uppercase | ||
| + | |- | ||
| + | |size(value) | ||
| + | |Returns the content-length in human readable form. <br/> @param value either the response object or the response.headers object<br/> | ||
| + | |- | ||
| + | |since(offset,time) | ||
| + | |Returns the time since an offset. Usage : <br/> since(12301230, request.time) => 50s or 1m23s<br/> @param offset the timestamp to count from<br/> @param time The timestamp from the request<br/> @return string | ||
| + | |- | ||
| + | |paramstring(value) | ||
| + | |Shows the parameterstring used. Removes directory and file - info from the raw string<br/> @param value: either the request object, the request.url object or hte request.url.raw string | ||
| + | |- | ||
| + | |pfilter_only(parameter,parameters) | ||
| + | | Paramfilter : Only<br/> Filters the parameters and shows only one parameter<br/> @param parameter String name of the parameter to show<br/> @param parameters : a dict with parameters (e.g request.url.parameters or request.data)<br/> @return dictionary or None<br/> | ||
| + | |- | ||
| + | |tfilter_remove(tag,tags) | ||
| + | |Tagfilter : Remove<br/> | ||
| + | |- | ||
| + | |FQHost(request) | ||
| + | |Creates a Fully Qualified hostname from a request object. <br/> Example: <br/> v0 = request<br/> FQHost(v0) => https://www.foobar.com:443<br/> | ||
| + | |- | ||
| + | |date(time) | ||
| + | |Returns the date on a short format (MMDD HH:MM:SS) 0301 15:30:25<br/> @param time The timestamp from the request (milliseconds) | ||
| + | |- | ||
| + | |setcookie(response) | ||
| + | |<br/> Shows any setcookie-commands returned from the server<br/> @param response : either response-object or response.headers<br/> | ||
| + | |- | ||
| + | |pfilter_remove(remove,params) | ||
| + | | Paramfilter : Remove<br/> Filters the parameters and hides selected parameter<br/> @param remove String name of the parameter to filter<br/> @param parameters : request.url.parameters<br/> @return dictionary<br/> | ||
| + | |- | ||
| + | |tfilter_only(tag,tags) | ||
| + | | Tagfilter : Only<br/> | ||
| + | |- | ||
| + | |time(time) | ||
| + | |Returns the date on a really short format (HH:MM:SS) 15:30:30<br/> @param time The timestamp from the request | ||
| + | |- | ||
| + | |showparams(url,form) | ||
| + | |<br/> Sorts parameters by keys. You can send in two dicts, and get the combined result. This makes it easier<br/> to show both form-data and url-data in the same column. Example<br/><br/> variable v2: request.url<br/> variable v3: request.data<br/> column: sortparams(v2, v3)<br/><br/> //Another version<br/> variable v1: request<br/> column: sortparams(form=v1.data,url=v1.url)<br/><br/> <br/> @param url: Should be the request.url object (optional)<br/> @param form: Should be the request.data object (optional) <br/> @return: uri-like string, e.g a=1&b=2&c=test <br/> <br/> | ||
| + | |- | ||
| + | |browser(request) | ||
| + | |<br/> Checks what browser issued the request based on UA-string. <br/> @param request - request object<br/> @return a short browser indicator, e.g "IE 6.0" or "FF 3.5" <br/> | ||
| + | |- | ||
| + | |||
| + | |} | ||
| + | |||
| + | If you have an idea for a transformer which would be nice to have, please send a proposal to the mailing list (or if you can, implement it in python and send the patch). | ||
| + | |||
| + | === Coloring === | ||
| + | If you are investigating a scenario where you have two different users on different browsers, you may want to be able to see which user a http dialogue concerns. One way to do that is to have a column where the cookies are displayed. However, this eats up a lot of screen real estate, and the actual bytes displayed are not interesting. If you have such a column, you can instead toggle to 'Color' checkbox. The coloring takes any input data (such as cookie string) and hashes it into a colorvalue, which is displayed instead. In the scenario described above, the result may be that one user has a blue square in that column while the other has a green one. | ||
| + | |||
| + | [[image]] | ||
| + | ==== Aggregation ==== | ||
Todo | Todo | ||
| + | ==== Database Filtering ==== | ||
| + | |||
| + | The table view (and the upcoming third-party view) supports database filtering. A database filter is a set of expressions which are evaluated in the database, and determines which items are returned in the result of a given query. '''Note:''' This is much like the WHERE-part of an SQL statement (on steroids). | ||
| + | |||
| + | == Native filters == | ||
| + | The filter contains two tabs. One is for 'native' expressions, where the syntax is a standard javascript object notation. Example below: a filter that returns only pages where (url-)parameters were present in the request. | ||
| + | |||
| + | [[Image:hatkit-datafiddler-datafilter-native.png]] | ||
| + | |||
| + | Some example operators which can be used: | ||
| + | * $exists | ||
| + | ** Check for existence (or lack thereof) of a field. | ||
| + | * $ne | ||
| + | ** Use $ne for "not equals". | ||
| + | * $in / $nin | ||
| + | ** The $in operator is analogous to the SQL IN modifier, allowing you to specify an array of possible matches. | ||
| + | * $or / $nor | ||
| + | ** The $or operator lets you use a boolean or expression to do queries. You give $or a list of expressions, any of which can satisfy the query. | ||
| + | |||
| + | It is also possible to use regular expression in the filters. For further information about how filtering works, and examples of operators which may be used, see the [http://www.mongodb.org/display/DOCS/Advanced+Queries MongoDB documentation] | ||
| + | |||
| + | == Javascript filters == | ||
| + | In the other tab, you can enter javascript expressions (a V8 engine is embedded inside the database). Simply enter a function which returns true if the object should be returned, false otherwise. Example below: a filter which only returns items where one of the request (url-) parameters were present in the html response - i.e reflected content. | ||
| + | |||
| + | [[Image:hatkit-datafiddler-datafilter-js.png]] | ||
| + | |||
| + | You can click 'Test' to see if the filter works. Javascript errors should be visible in the mongodb console, and the number of matches should be shown in the text pane: | ||
| + | |||
| + | [[Image:hatkit-datafiddler-datafilter-js-test.png]] | ||
| + | |||
| + | If you write a good filter, you can click "Save as" so you don't have to retype it next time. A good set of standard filters for different purposes is planned for inclusion at a later stage. In the meantime, if you write any handy filters you are encouraged to post them to the datafiddler mailing list. | ||
| + | ==== Development ==== | ||
| + | If you don't already use Mercurial, first do | ||
| + | sudo apt-get install hg | ||
| + | Then fetch the code: | ||
| + | hg clone https://owasp.org/index.php/OWASP_Hatkit_Datafiddler_Project | ||
| + | |||
| + | After that, it's smooth sailing. If you have something to commit, you can create a bitbucket-account create a 'fork' there, where you can publish changes which can then be pulled into the main repository. | ||
==== Project About ==== | ==== Project About ==== | ||
Latest revision as of 19:56, 23 January 2014
| |
|
|---|---|

|
Main
The Hatkit Datafiddler is a tool for performing analysis of captured http traffic. It currently consists of two main views, one table-based and one tree-based. These views allow the user to study different aspects of the http traffic, with very high degree of configurability. The tool is also meant to be a framework which can utilize existing tools analyze traffic.
It is written in Python with a Qt-based UI and uses a MongoDB database. It has a sister-project, which is the Hatkit Proxy
Getting started
First of all, visit BitBucket download page to check which is the latest release. Then get it:
$ wget https://bitbucket.org/holiman/hatkit-datafiddler/downloads/hatkit_datafiddler-0.5.0.zip
$ unzip hatkit_datafiddler-0.5.0.zip
$ cd hatkit_datafiddler-0.5.0/
$ python datafiddler.py
Datafiddler will tell you about any missing dependencies with something like this:
Unfortunately, you have the following missing dependencies:
 * python-qt4 : Python bindings for Qt4
 * pymongo : Python drivers for MongoDB
Fetch them via your favourite package manager (on *nix systems. Windows is currently not endorsed). Naturally, you need a MongoDB also. MongoDB is available either from the package repositories or from MongoDB download section.
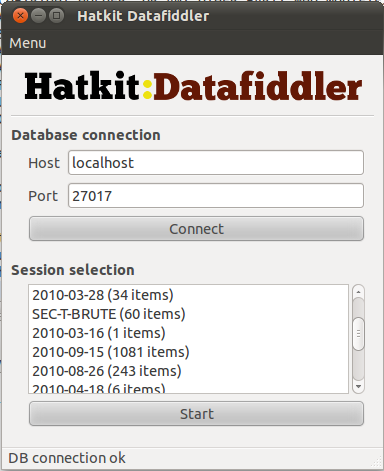
If all goes well, you should be met by this screen, where you can choose which session to use. Sessions are really just databases, but Datafiddler only lists the databases in your MongoDB which contain a collection called conversations.
Table view
The table view displays data in a 1:1 mapping, where every line in a table corresponds to one 'object' in the database. One 'object' contains the request, the response and some extra data. What is special about the Datafiddler is that what you see here is fully customizable.
Settings
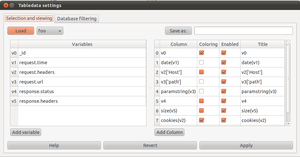
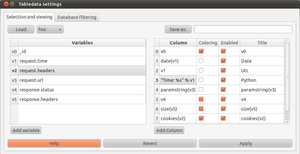
If you select Settings, you will be met by the settings-window. This window gives you tools to define what is displayed in the table view to suit your current task.
The section below is pretty technical. You don't have to know python or javascript to use this tool, Datafiddler comes with predefined expressions and views that you can use. When you learn the ropes a bit, you can just make modifications to these and you should be fine.
On the left side, there are variables. For each object which is fetched from the database, these expressions determines exactly what parts are fetched and places these parts, into python variables with the names v0 and onward. On the right side, there are the actual definitions of the columns that are shown in the table. These column definitions are python expressions which are evaluated at display-time, and are therefore able to either display a variable directly or perform operations on them and display the result.
For example, a database object stored by Hatkit Proxy always contain these fields:
request
response
(For more details about storage format, see OWASP_Hatkit_Proxy_Project#tab=Storage Storage
If the request part of a database object is loaded into v0, it means that v0 will contain python dictionary containing everything that concerns the request. E.g. The python expression v0['method'] will be the request verb (GET/POST/FOO),while the expression v0['headers'] will be another python dictionary containing the request headers.
This means that this object introspection can be performed either inside the database - which is using javascript, or in the application itself, using python. Example:
v0 = request.headers.Host ==> v0 : "foobar.com"
v0 = request ==> v0['headers']['Host'] : "foobar.com"
Worth mentioning though, is that accessing a non-existant attribute (or member) in javascripts returns undefined:
var x = {};
alert(x.foo); // alerts "undefined"
alert(x.foo.bar); // yields exception
While in python, a similar operation yields exception sooner:
>>> x={}
>>> x["foo"]
Traceback (most recent call last):
  File "<stdin>", line 1, in <module>
KeyError: 'foo'
Also, it makes sense to fetch only what is required for the kind of view that you are interested in. If you are analysing session tokens, it is less resource intensive on your machine not to fetch the html content of each response.
What to show: Database Filtering
Please see the tab called "Database Filtering".
How to show it
Transformers
Once objects or part of objects have been loaded into variablesv1 ... vn, it is possible to perform operations on these objects using python. It is possible to use arbitrary python statemenets, but a set of so called 'transformers' are implemented specifically for the purpose of analysing http traffic:
| dictToString(val) | Flattens a dictionary to url-like string. Example: dictToString({'x':'y', 'foo':'bar'}) => x=y&foo=bar |
| cookies(request) | Shows cookies @param request: either request object or request.headers |
| longdate(time) | Returns the date on a longer format (YYYY MM DD HH:MM:SS) @param time The timestamp from the request |
| getheader(o,header) | Gets a header value from either a response object,response.headers object, request object or request.headers object. @return the header value or None |
| toupper(val) | Dummy example transform: makes the input into uppercase |
| size(value) | Returns the content-length in human readable form. @param value either the response object or the response.headers object |
| since(offset,time) | Returns the time since an offset. Usage : since(12301230, request.time) => 50s or 1m23s @param offset the timestamp to count from @param time The timestamp from the request @return string |
| paramstring(value) | Shows the parameterstring used. Removes directory and file - info from the raw string @param value: either the request object, the request.url object or hte request.url.raw string |
| pfilter_only(parameter,parameters) | Paramfilter : Only Filters the parameters and shows only one parameter @param parameter String name of the parameter to show @param parameters : a dict with parameters (e.g request.url.parameters or request.data) @return dictionary or None |
| tfilter_remove(tag,tags) | Tagfilter : Remove |
| FQHost(request) | Creates a Fully Qualified hostname from a request object. Example: v0 = request FQHost(v0) => https://www.foobar.com:443 |
| date(time) | Returns the date on a short format (MMDD HH:MM:SS) 0301 15:30:25 @param time The timestamp from the request (milliseconds) |
| setcookie(response) | Shows any setcookie-commands returned from the server @param response : either response-object or response.headers |
| pfilter_remove(remove,params) | Paramfilter : Remove Filters the parameters and hides selected parameter @param remove String name of the parameter to filter @param parameters : request.url.parameters @return dictionary |
| tfilter_only(tag,tags) | Tagfilter : Only |
| time(time) | Returns the date on a really short format (HH:MM:SS) 15:30:30 @param time The timestamp from the request |
| showparams(url,form) | Sorts parameters by keys. You can send in two dicts, and get the combined result. This makes it easier to show both form-data and url-data in the same column. Example variable v2: request.url variable v3: request.data column: sortparams(v2, v3) //Another version variable v1: request column: sortparams(form=v1.data,url=v1.url) @param url: Should be the request.url object (optional) @param form: Should be the request.data object (optional) @return: uri-like string, e.g a=1&b=2&c=test |
| browser(request) | Checks what browser issued the request based on UA-string. @param request - request object @return a short browser indicator, e.g "IE 6.0" or "FF 3.5" |
If you have an idea for a transformer which would be nice to have, please send a proposal to the mailing list (or if you can, implement it in python and send the patch).
Coloring
If you are investigating a scenario where you have two different users on different browsers, you may want to be able to see which user a http dialogue concerns. One way to do that is to have a column where the cookies are displayed. However, this eats up a lot of screen real estate, and the actual bytes displayed are not interesting. If you have such a column, you can instead toggle to 'Color' checkbox. The coloring takes any input data (such as cookie string) and hashes it into a colorvalue, which is displayed instead. In the scenario described above, the result may be that one user has a blue square in that column while the other has a green one.
Aggregation
Todo
Database Filtering
The table view (and the upcoming third-party view) supports database filtering. A database filter is a set of expressions which are evaluated in the database, and determines which items are returned in the result of a given query. Note: This is much like the WHERE-part of an SQL statement (on steroids).
Native filters
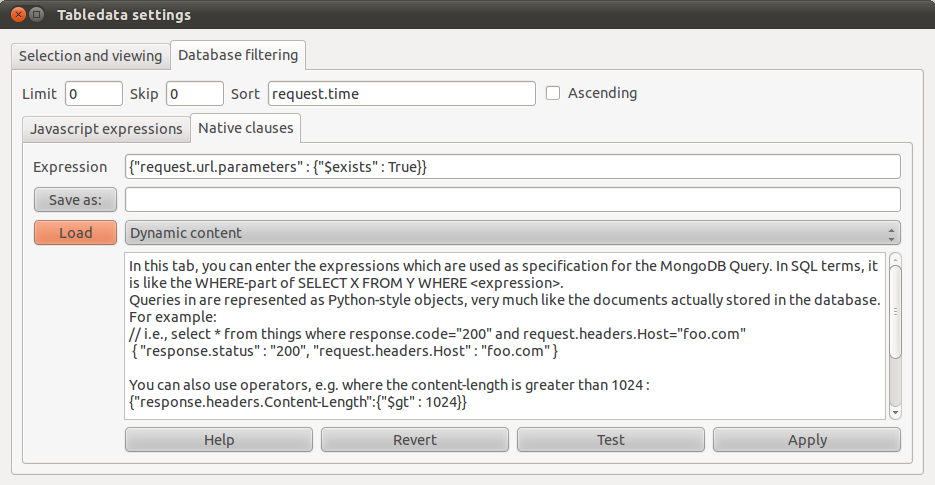
The filter contains two tabs. One is for 'native' expressions, where the syntax is a standard javascript object notation. Example below: a filter that returns only pages where (url-)parameters were present in the request.
Some example operators which can be used:
- $exists
- Check for existence (or lack thereof) of a field.
- $ne
- Use $ne for "not equals".
- $in / $nin
- The $in operator is analogous to the SQL IN modifier, allowing you to specify an array of possible matches.
- $or / $nor
- The $or operator lets you use a boolean or expression to do queries. You give $or a list of expressions, any of which can satisfy the query.
It is also possible to use regular expression in the filters. For further information about how filtering works, and examples of operators which may be used, see the MongoDB documentation
Javascript filters
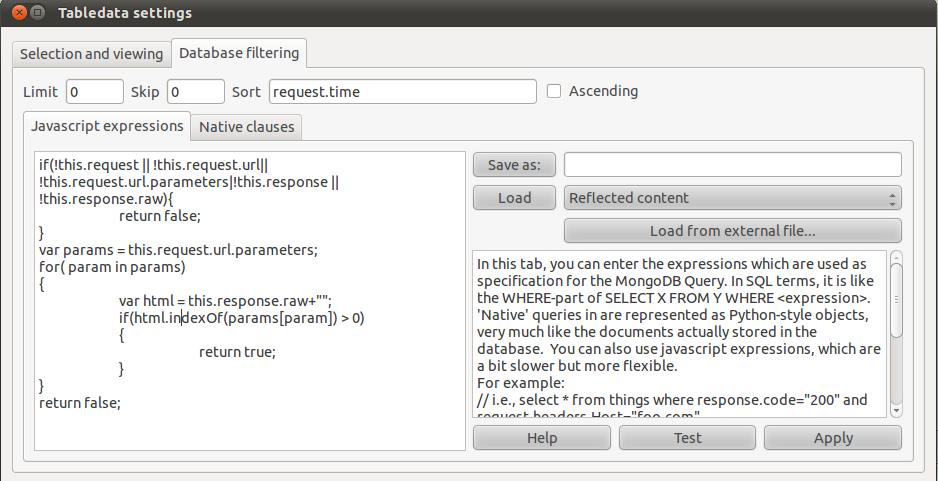
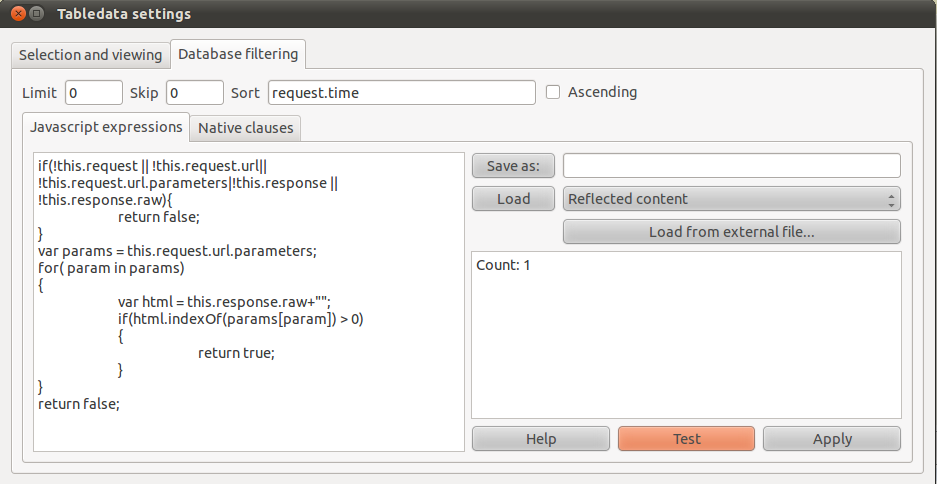
In the other tab, you can enter javascript expressions (a V8 engine is embedded inside the database). Simply enter a function which returns true if the object should be returned, false otherwise. Example below: a filter which only returns items where one of the request (url-) parameters were present in the html response - i.e reflected content.
You can click 'Test' to see if the filter works. Javascript errors should be visible in the mongodb console, and the number of matches should be shown in the text pane:
If you write a good filter, you can click "Save as" so you don't have to retype it next time. A good set of standard filters for different purposes is planned for inclusion at a later stage. In the meantime, if you write any handy filters you are encouraged to post them to the datafiddler mailing list.
Development
If you don't already use Mercurial, first do
sudo apt-get install hg
Then fetch the code:
hg clone https://owasp.org/index.php/OWASP_Hatkit_Datafiddler_Project
After that, it's smooth sailing. If you have something to commit, you can create a bitbucket-account create a 'fork' there, where you can publish changes which can then be pulled into the main repository.
Project About
| PROJECT INFO What does this OWASP project offer you? |
RELEASE(S) INFO What releases are available for this project? | |||||||||||||||||||||||||||||||||||||||||||||
|---|---|---|---|---|---|---|---|---|---|---|---|---|---|---|---|---|---|---|---|---|---|---|---|---|---|---|---|---|---|---|---|---|---|---|---|---|---|---|---|---|---|---|---|---|---|---|
|
| |||||||||||||||||||||||||||||||||||||||||||||

