This site is the archived OWASP Foundation Wiki and is no longer accepting Account Requests.
To view the new OWASP Foundation website, please visit https://owasp.org
Difference between revisions of "ORG (OWASP Report Generator)"
Medelibero (talk | contribs) (→TODO) |
|||
| (96 intermediate revisions by 7 users not shown) | |||
| Line 1: | Line 1: | ||
| − | The ORG ( | + | {| |
| + | |- | ||
| + | ! width="700" align="center" | <br> | ||
| + | ! width="500" align="center" | <br> | ||
| + | |- | ||
| + | | align="right" | [[Image:OWASP Inactive Banner.jpg|800px| link=https://www.owasp.org/index.php/OWASP_Project_Stages#tab=Inactive_Projects]] | ||
| + | | align="right" | | ||
| + | |||
| + | |} | ||
| + | ==== Main ==== | ||
| + | |||
| + | The ORG (OWASP Report Generator) is a tool for Security Consultants that supports the documentation and reporting of security vulnerabilities discovered during security audits. | ||
| + | |||
| + | Currently [[:User:Mroxberr|'''Mark Roxberry''']] leads this project. Formerly the project leader was [[User:Dinis.cruz|Dinis Cruz]] with strong contributions from [[User:medelibero|Mike de Libero]]. Mike was sponsored under an OWASP Autumn of Code 2006 sponsorship to work on ORG. | ||
== Downloads == | == Downloads == | ||
| − | |||
| − | + | The latest release of ORG's installer can be found at (updated on 1/15/2007) - Please note that the installer will not work on Windows x64 bit architecutre (you have to use the source code from the zip file below - . | |
| − | + | [http://sourceforge.net/project/downloading.php?group_id=64424&use_mirror=osdn&filename=ORG_v0.88.msi Report Generator Installer] | |
| − | + | ||
| + | The source code for latest stable version can be downloaded from here (updated on 11/1/2006): [http://prdownloads.sourceforge.net/owasp/ReportGenerator.zip Report Generator Source] | ||
| + | |||
| + | This project is in active development and the latest version can be obtained from [http://owasp-code-central.googlecode.com/svn/trunk/labs/ReportGenerator Google SVN] | ||
| + | |||
| + | '''Instructions for using the zip file''' | ||
| + | |||
| + | 1) Unzip the files | ||
| + | 2) Run regAuthenticPlugin.bat to register the AuthenticPlugin | ||
| − | + | 3) Open the solution in VS.Net 2k5. You can use any version of VS but the primary version used for development is the express edition. | |
| − | |||
| − | |||
| − | |||
| − | |||
| − | |||
| − | |||
| − | |||
| − | |||
| − | |||
| − | |||
| − | |||
| − | |||
| − | |||
| − | |||
| − | |||
| − | |||
| − | |||
| − | |||
| − | |||
| − | |||
| − | |||
| − | |||
| − | |||
| − | |||
| − | |||
| − | |||
| − | |||
| − | |||
| − | |||
| − | |||
| − | |||
| − | |||
| − | |||
| − | |||
| − | |||
| − | |||
| − | |||
| − | |||
| − | |||
| + | 4) More than likely you need to modify the references area to use the local files for [IxInterop|AxInterop].XMLSPYPLUGIN. | ||
| − | + | 5) For Windows 64bit, do the following: In the project properties, select "Build Events" then in Post-build event command line add the following lines: | |
| + | call "$(DevEnvDir)..\tools\vsvars32.bat" | ||
| − | + | editbin.exe /NXCOMPAT:NO "$(TargetPath)" | |
| + | 6) Then try and compile and you should be good to go. If not contact Mike and we will work with you to get it all straightened out and so we can adjust this process. | ||
| + | |||
| + | == ORG Development == | ||
| + | |||
| + | The current version under development is v0.86 and you can see the change log here: [[ORG (Owasp Report Generator) - Change Log]] | ||
| + | |||
| + | The current Todo is here: [[ORG (Owasp Report Generator) - To Do]] | ||
| + | |||
| + | == Getting setup for an assessment == | ||
| + | |||
| + | '''Step 1)''' Create a profile for you to use on your computer. You can do this on the first screen that will be encountered when running ORG. | ||
| + | |||
| + | [[Image:Profile_ss.jpg]] | ||
| + | |||
| + | Once the information has been inputted click on “Start Pen Test Reporter” and you are ready to start adding new projects. | ||
| + | |||
| + | |||
| + | '''Step 2)''' The next step is to create a project. With the “Current and Archived Projects” window open make sure that the project metadata tab is selected. From there in the lower left hand corner you will see an area to type in a new project and then click “Add”. You will then see a window like the one below. | ||
| + | |||
| + | [[Image:Project_setup_ss.jpg]] | ||
| + | |||
| + | You can now type in the pertinent information about your project. After that you are ready to identify your targets and start attacking (i.e. the fun part!). | ||
| + | |||
| + | |||
| + | '''Step 3)''' Next click on the targets tab, this will allow you to define the targets for your assessment. Below is a screen shot of an example of a target during an assessment. | ||
| + | |||
| + | [[Image:Org_target_ss.jpg]] | ||
| + | |||
| + | The above area gives you the logistics of the target things like name, IP(s), the type of target and common dns names. The bottom area allows you to put files related to the target. | ||
| + | |||
| + | |||
| + | You can also import in targets from an NMap scan if you use the xml output file option. To do import targets click the “Import Targets” button and select the saved scan. | ||
| + | |||
| + | |||
| + | '''Step 4)''' After defining the attack targets you can specify the individual tasks you wish to perform on the targets. A screen like the one below should be shown. | ||
| + | |||
| + | [[Image:Org_target_tasks_ss.jpg]] | ||
| + | |||
| + | Using this screen you can manage the tasks that need to be done for an assessment, things like information gathering, auditing of source code and other tasks that are normally done during a security audit. You can specify the state of each task with the drop down in the status column. | ||
| + | |||
| + | |||
| + | We now have all the background information but we need a way to let our customers know what we have found that is where the findings tab comes into play. | ||
| + | |||
| + | == Recording assessment findings == | ||
| + | During an assessment you can record all your findings using the findings tab in the projects form. All findings must be associated to a target. An example findings window is below. These findings will later be added to reports that you will give to your customers. | ||
| + | |||
| + | [[Image:Org_findings_ss.jpg]] | ||
| + | |||
| + | You can add screenshots to the additional details area of the findings screen as well. To create findings use the “Add Finding” area. This will give you a blank slate and initially use the simple mode. | ||
| + | |||
| + | |||
| + | You can change the template for the editor by using the drop down labeled “Editor Template To Use”. There are two other options besides simple mode they are: Authentic – All Fields Mode and Windows Explorer. The all fields mode allows you to specify more detailed information. While, the windows explorer mode allows you to add other artifacts related to this finding, like code excerpts, PoC code, etc… | ||
| + | |||
| + | |||
| + | After we are done finding all the holes in our targets we need to report them to our customers. | ||
| + | |||
| + | == Reporting Our Findings == | ||
| + | '''Step 1)''' Click on the “Report Contents” tab and fill out the information there. This will be later used for the executive summary and other reports that need to be ran. Below is an example screen of the report contents filled out. | ||
| + | |||
| + | [[Image:Org_report_contents_tab_ss.jpg]] | ||
| + | |||
| + | Click on ”Save Report Contents” and we are ready for the next step generating a report. | ||
| + | |||
| + | |||
| + | '''Step 2)''' The first thing to do is click on the “Report Pdf” tab. Select the xslt you wish to use for the report then select “FOP” for what you want to create the report with. Then click on “Create report files using”. After clicking on the button a small PDF reader will show up on the form. You can then save the report to wherever you wish. An example screen shot is below. | ||
| + | |||
| + | [[Image:Org_pdf_report_ss.jpg]] | ||
| + | |||
| + | The other way to create reports is by click on the reports button at the very top. You will see a screen like the one below. | ||
| + | |||
| + | [[Image:Org_reports_ss.jpg]] | ||
| + | |||
| + | == Adding new entries into drop downs == | ||
| + | A user has the ability to modify the values in the drop downs in the targets, findings, project details and target tasks by modifying the any sps files under <Application_Path>/VulnReport_Files/sps/. | ||
| + | |||
| + | == ORG Active Developers == | ||
| + | |||
| + | * [[ORG (Owasp Report Generator) - Mike de Libero]] | ||
| + | * [[ORG (Owasp Report Generator) - Dinis Cruz]] | ||
| + | |||
| + | Other related [[https://sourceforge.net/project/showfiles.php?group_id=64424&package_id=105632 OWASP .Net Project Downloads]] | ||
| + | |||
| + | == Building the Installer == | ||
| + | ORG is built using the WiX installer [http://wix.sourceforge.net/]. The assumption is that the folder housing the WiX libraries is in your search path. | ||
| + | |||
| + | * Setup a directory like the below screen shot | ||
| + | ** '''Note''' the following files can be found in the Google SVN: BuildInstaller.bat, FOP.zip.txt, regAuthenticPlugin.bat, ORG_v0.88.wxs, ORG_CONFIG_FILEs.zip.txt, AuthenticPlugin.zip.txt, AxInterop.PdfLib.dll, AxInterop.SHDocVw.dll, AxInterop.XMLSPYPLUGINLib.dll, ICSharpCode.TextEditor.dll, ICSharpCode.TextEditor.dll, Interop.SHDocVw.dll, Interop.XMLSPYPLUGINLib.dll, SharpZipLib.dll | ||
| + | [[Image:Org_installer_files_ss.gif]] | ||
| + | * Run the batch script BuildInstaller.bat | ||
| + | |||
| + | When a new version of the installer needs to be built the ID for the product element needs to be replaced along with the version information. | ||
| + | |||
| + | <!-- ==== Project Identification ==== | ||
| + | {{Template:OWASP Report Generator Project - GPC Tab}} | ||
| + | [[Category:OWASP Project|Report Generator)]] | ||
[[Category:OWASP .NET Project]] | [[Category:OWASP .NET Project]] | ||
| + | [[Category:OWASP Tool]] | ||
| + | [[Category:OWASP Download]] | ||
| + | [[Category:OWASP Alpha Quality Tool]] --> | ||
| + | |||
| + | ==== Project Identification ==== | ||
| + | |||
| + | [[Category:OWASP Project|Report Generator)]] | ||
| + | [[Category:OWASP .NET Project]] | ||
| + | [[Category:OWASP Tool]] | ||
| + | [[Category:OWASP Download]] | ||
| + | [[Category:OWASP Alpha Quality Tool]] | ||
| + | |||
| + | {{Template:OWASP Project Identification Tab | ||
| + | | project_name = OWASP Report Generator Project | ||
| + | | project_description = The ORG (OWASP Report Generator) is a multi-purpose reporting tool designed to be extensible for various reporting needs. By using what is known as a provider model, report providers can be plugged in to ORG. OWASP Report Providers will include Penetration Testing and SDL. The Penetration Testing Report Provider supports the documentation and reporting of security vulnerabilities discovered during security audits. The SDL Report Provider supports the documentation and reporting requirements of the Secure Development Lifecycle. Beyond OWASP Report Providers, the community can leverage the ORG for their own reporting needs. | ||
| + | | project_license = [http://www.gnu.org/copyleft/lesser.html GNU Lesser General Public License] | ||
| + | | leader_name = Mark Roxberry | ||
| + | | leader_email = | ||
| + | | leader_username = Mroxberr | ||
| + | | maintainer_name = Mark Roxberry | ||
| + | | maintainer_email = | ||
| + | | maintainer_username = Mroxberr | ||
| + | | contributor_name1 = | ||
| + | | contributor_email1 = | ||
| + | | contributor_username1 = | ||
| + | | contributor_name2 = | ||
| + | | contributor_email2 = | ||
| + | | contributor_username2 = | ||
| + | | contributor_name3 = | ||
| + | | contributor_email3 = | ||
| + | | contributor_username3 = | ||
| + | | contributor_name4 = | ||
| + | | contributor_email4 = | ||
| + | | contributor_username4 = | ||
| + | | contributor_name5 = | ||
| + | | contributor_email5 = | ||
| + | | contributor_username5 = | ||
| + | | contributor_name6 = | ||
| + | | contributor_email6 = | ||
| + | | contributor_username6 = | ||
| + | | contributor_name7 = | ||
| + | | contributor_email7 = | ||
| + | | contributor_username7 = | ||
| + | | contributor_name8 = | ||
| + | | contributor_email8 = | ||
| + | | contributor_username8 = | ||
| + | | contributor_name9 = | ||
| + | | contributor_email9 = | ||
| + | | contributor_username9 = | ||
| + | | contributor_name10 = | ||
| + | | contributor_email10 = | ||
| + | | contributor_username10 = | ||
| + | | pamphlet_link = | ||
| + | | presentation_link = | ||
| + | | mailing_list_name = owasp-org | ||
| + | | links_url1 = http://code.google.com/p/org2/ | ||
| + | | links_name1 = Code | ||
| + | | links_url2 = http://owasprox.blogspot.com/search/label/org2 | ||
| + | | links_name2 = Blog | ||
| + | | links_url3 = | ||
| + | | links_name3 = | ||
| + | | links_url4 = | ||
| + | | links_name4 = | ||
| + | | links_url5 = | ||
| + | | links_name5 = | ||
| + | | links_url6 = | ||
| + | | links_name6 = | ||
| + | | links_url7 = | ||
| + | | links_name7 = | ||
| + | | links_url8 = | ||
| + | | links_name8 = | ||
| + | | links_url9 = | ||
| + | | links_name9 = | ||
| + | | links_url10 = | ||
| + | | links_name10 = | ||
| + | | project_road_map = http://code.google.com/p/org2/wiki/RoadMap | ||
| + | | project_health_status = | ||
| + | | current_release_name = ORG v.088 | ||
| + | | current_release_date = August 2009 | ||
| + | | current_release_download_link = http://sourceforge.net/project/downloading.php?group_id=64424&use_mirror=osdn&filename=ORG_v0.88.msi | ||
| + | | current_release_details = :Category:OWASP_Report_Generator_Project_-_ORG_v.088_Release | ||
| + | | current_release_rating = - 1 | ||
| + | | current_release_leader_name = Dinis Cruz | ||
| + | | current_release_leader_email = | ||
| + | | current_release_leader_username = Dinis.cruz | ||
| + | | last_reviewed_release_name = | ||
| + | | last_reviewed_release_date = | ||
| + | | last_reviewed_release_download_link = | ||
| + | | last_reviewed_release_rating = | ||
| + | | last_reviewed_release_leader_name = | ||
| + | | last_reviewed_release_leader_email = | ||
| + | | last_reviewed_release_leader_username = | ||
| + | | old_release_name1 = | ||
| + | | old_release_date1 = | ||
| + | | old_release_download_link1 = | ||
| + | | old_release_name2 = | ||
| + | | old_release_date2 = | ||
| + | | old_release_download_link2 = | ||
| + | | old_release_name3 = | ||
| + | | old_release_date3 = | ||
| + | | old_release_download_link3 = | ||
| + | | old_release_name4 = | ||
| + | | old_release_date4 = | ||
| + | | old_release_download_link4 = | ||
| + | | old_release_name5 = | ||
| + | | old_release_date5 = | ||
| + | | old_release_download_link5 = | ||
| + | }} | ||
| + | __NOTOC__ <headertabs /> | ||
Latest revision as of 19:51, 23 January 2014
| |
|
|---|---|

|
Main
The ORG (OWASP Report Generator) is a tool for Security Consultants that supports the documentation and reporting of security vulnerabilities discovered during security audits.
Currently Mark Roxberry leads this project. Formerly the project leader was Dinis Cruz with strong contributions from Mike de Libero. Mike was sponsored under an OWASP Autumn of Code 2006 sponsorship to work on ORG.
Downloads
The latest release of ORG's installer can be found at (updated on 1/15/2007) - Please note that the installer will not work on Windows x64 bit architecutre (you have to use the source code from the zip file below - . Report Generator Installer
The source code for latest stable version can be downloaded from here (updated on 11/1/2006): Report Generator Source
This project is in active development and the latest version can be obtained from Google SVN
Instructions for using the zip file
1) Unzip the files
2) Run regAuthenticPlugin.bat to register the AuthenticPlugin
3) Open the solution in VS.Net 2k5. You can use any version of VS but the primary version used for development is the express edition.
4) More than likely you need to modify the references area to use the local files for [IxInterop|AxInterop].XMLSPYPLUGIN.
5) For Windows 64bit, do the following: In the project properties, select "Build Events" then in Post-build event command line add the following lines:
call "$(DevEnvDir)..\tools\vsvars32.bat"
editbin.exe /NXCOMPAT:NO "$(TargetPath)"
6) Then try and compile and you should be good to go. If not contact Mike and we will work with you to get it all straightened out and so we can adjust this process.
ORG Development
The current version under development is v0.86 and you can see the change log here: ORG (Owasp Report Generator) - Change Log
The current Todo is here: ORG (Owasp Report Generator) - To Do
Getting setup for an assessment
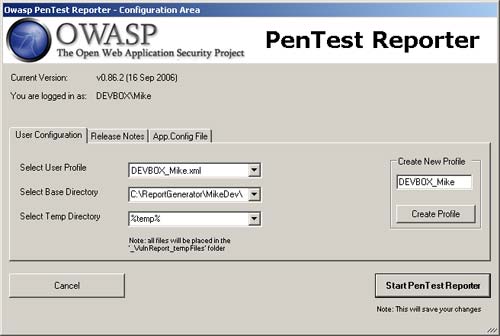
Step 1) Create a profile for you to use on your computer. You can do this on the first screen that will be encountered when running ORG.
Once the information has been inputted click on “Start Pen Test Reporter” and you are ready to start adding new projects.
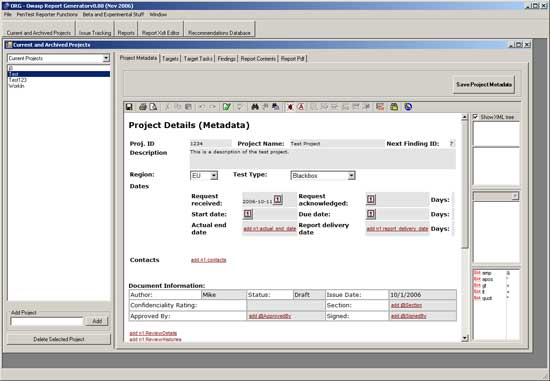
Step 2) The next step is to create a project. With the “Current and Archived Projects” window open make sure that the project metadata tab is selected. From there in the lower left hand corner you will see an area to type in a new project and then click “Add”. You will then see a window like the one below.
You can now type in the pertinent information about your project. After that you are ready to identify your targets and start attacking (i.e. the fun part!).
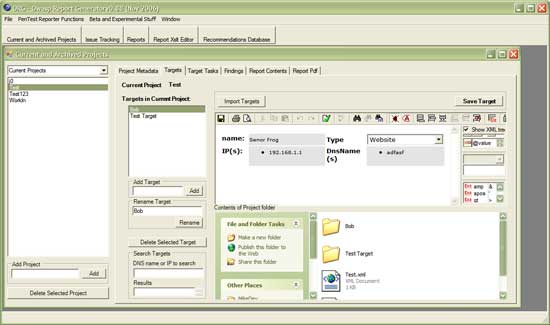
Step 3) Next click on the targets tab, this will allow you to define the targets for your assessment. Below is a screen shot of an example of a target during an assessment.
The above area gives you the logistics of the target things like name, IP(s), the type of target and common dns names. The bottom area allows you to put files related to the target.
You can also import in targets from an NMap scan if you use the xml output file option. To do import targets click the “Import Targets” button and select the saved scan.
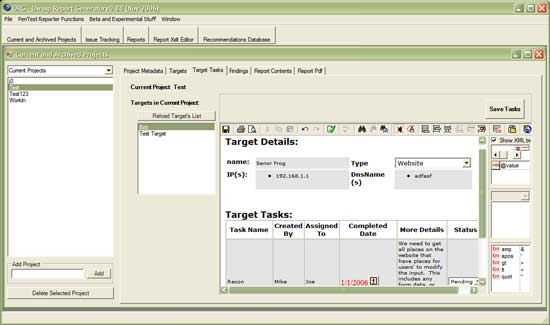
Step 4) After defining the attack targets you can specify the individual tasks you wish to perform on the targets. A screen like the one below should be shown.
Using this screen you can manage the tasks that need to be done for an assessment, things like information gathering, auditing of source code and other tasks that are normally done during a security audit. You can specify the state of each task with the drop down in the status column.
We now have all the background information but we need a way to let our customers know what we have found that is where the findings tab comes into play.
Recording assessment findings
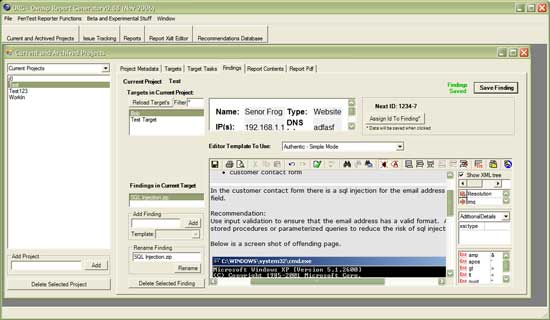
During an assessment you can record all your findings using the findings tab in the projects form. All findings must be associated to a target. An example findings window is below. These findings will later be added to reports that you will give to your customers.
You can add screenshots to the additional details area of the findings screen as well. To create findings use the “Add Finding” area. This will give you a blank slate and initially use the simple mode.
You can change the template for the editor by using the drop down labeled “Editor Template To Use”. There are two other options besides simple mode they are: Authentic – All Fields Mode and Windows Explorer. The all fields mode allows you to specify more detailed information. While, the windows explorer mode allows you to add other artifacts related to this finding, like code excerpts, PoC code, etc…
After we are done finding all the holes in our targets we need to report them to our customers.
Reporting Our Findings
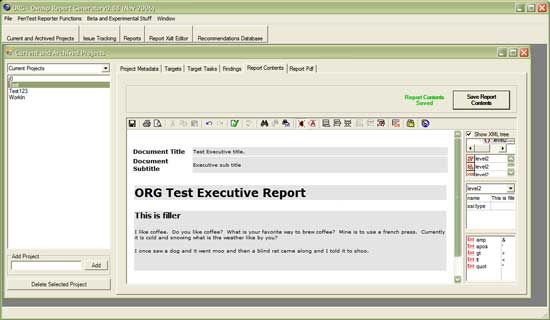
Step 1) Click on the “Report Contents” tab and fill out the information there. This will be later used for the executive summary and other reports that need to be ran. Below is an example screen of the report contents filled out.
Click on ”Save Report Contents” and we are ready for the next step generating a report.
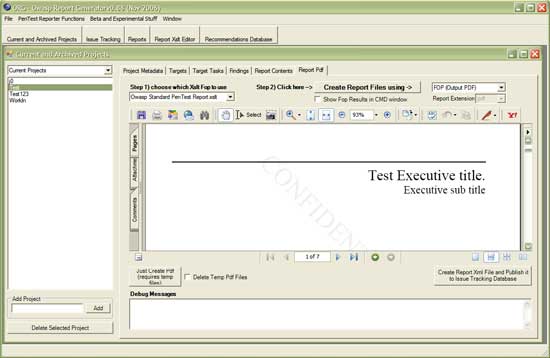
Step 2) The first thing to do is click on the “Report Pdf” tab. Select the xslt you wish to use for the report then select “FOP” for what you want to create the report with. Then click on “Create report files using”. After clicking on the button a small PDF reader will show up on the form. You can then save the report to wherever you wish. An example screen shot is below.
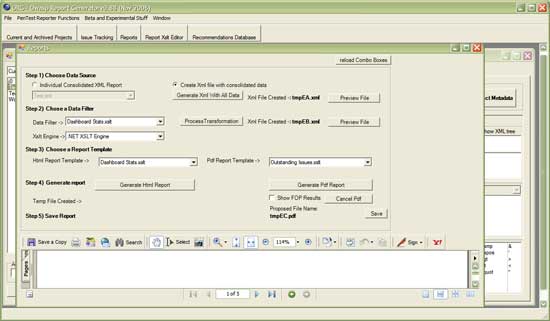
The other way to create reports is by click on the reports button at the very top. You will see a screen like the one below.
Adding new entries into drop downs
A user has the ability to modify the values in the drop downs in the targets, findings, project details and target tasks by modifying the any sps files under <Application_Path>/VulnReport_Files/sps/.
ORG Active Developers
Other related [OWASP .Net Project Downloads]
Building the Installer
ORG is built using the WiX installer [1]. The assumption is that the folder housing the WiX libraries is in your search path.
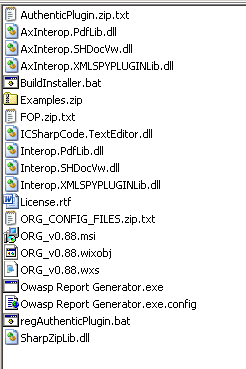
- Setup a directory like the below screen shot
- Note the following files can be found in the Google SVN: BuildInstaller.bat, FOP.zip.txt, regAuthenticPlugin.bat, ORG_v0.88.wxs, ORG_CONFIG_FILEs.zip.txt, AuthenticPlugin.zip.txt, AxInterop.PdfLib.dll, AxInterop.SHDocVw.dll, AxInterop.XMLSPYPLUGINLib.dll, ICSharpCode.TextEditor.dll, ICSharpCode.TextEditor.dll, Interop.SHDocVw.dll, Interop.XMLSPYPLUGINLib.dll, SharpZipLib.dll
- Run the batch script BuildInstaller.bat
When a new version of the installer needs to be built the ID for the product element needs to be replaced along with the version information.
Project Identification
| PROJECT INFO What does this OWASP project offer you? |
RELEASE(S) INFO What does this OWASP project release offer you? | ||||||||||||||||||||||
|---|---|---|---|---|---|---|---|---|---|---|---|---|---|---|---|---|---|---|---|---|---|---|---|
|
| ||||||||||||||||||||||
