This site is the archived OWASP Foundation Wiki and is no longer accepting Account Requests.
To view the new OWASP Foundation website, please visit https://owasp.org
Difference between revisions of "WebScarab Getting Started"
m (WebScarab Tutorial moved to WebScarab Getting Started: Not planning to do a complete tutorial in this document.) |
|||
| (5 intermediate revisions by 4 users not shown) | |||
| Line 1: | Line 1: | ||
| + | {{taggedDocument | ||
| + | | type=historical | ||
| + | | link=OWASP Zed Attack Proxy Project | ||
| + | }} | ||
| + | |||
'''WebScarab''' has a large amount of functionality, and as such can be quite intimidating to the new user. But, for the simplest case, intercepting and modifying requests and responses between a browser and HTTP/S server, there is not a lot that needs to be learned. | '''WebScarab''' has a large amount of functionality, and as such can be quite intimidating to the new user. But, for the simplest case, intercepting and modifying requests and responses between a browser and HTTP/S server, there is not a lot that needs to be learned. | ||
| − | Initially, I will assume that you have full unrestricted access to the Internet (that is, you are not behind a proxy) | + | Initially, I will assume that you have full unrestricted access to the Internet (that is, you are not behind a proxy). For the sake of simplicity, I will also assume that you are using Internet Explorer. If you need to use a proxy to get out of your corporate network, , see [[Chaining WebScarab onto another proxy ]] |
[[Image:WebScarab_startup.png]] | [[Image:WebScarab_startup.png]] | ||
| Line 18: | Line 23: | ||
You should see something similar to the next image. If you don't, or you get an error while browsing, you should go back and check your proxy settings in Internet Explorer as described above. If the proxy settings are correct, one possibility is that there is already another program that is using port 8008, and preventing WebScarab from using it. If so, you should stop that other program. I will also show you how to tell WebScarab how to use a different port a bit later. | You should see something similar to the next image. If you don't, or you get an error while browsing, you should go back and check your proxy settings in Internet Explorer as described above. If the proxy settings are correct, one possibility is that there is already another program that is using port 8008, and preventing WebScarab from using it. If so, you should stop that other program. I will also show you how to tell WebScarab how to use a different port a bit later. | ||
| + | |||
| + | '''NOTE:''' If you are using WebScarab to test a site that is running the same computer as the browser (i.e. localhost or 127.0.0.1), and you are using IE7, you will need to add a dot "." after the hostname to force IE7 to use the proxy that you have configured. This is NOT a bug in WebScarab, but an unfortunate design decision (I assume) made by the developers of IE. Basically, it will ignore any proxy settings if it thinks that the server you are trying to reach is on the local machine. One way of tricking it is to add the dot, as in http://localhost./WebGoat/attack. This will force IE to use your configured proxy. | ||
[[Image:WebScarab after browsing.png]] | [[Image:WebScarab after browsing.png]] | ||
| Line 44: | Line 51: | ||
You can also configure WebScarab to intercept responses, in case you want to change the behaviour of some parts of the page. For example, you can disable JavaScript validation, change the list of possible items in a '''SELECT''' field, etc. | You can also configure WebScarab to intercept responses, in case you want to change the behaviour of some parts of the page. For example, you can disable JavaScript validation, change the list of possible items in a '''SELECT''' field, etc. | ||
| + | |||
| + | == Tips and tricks == | ||
| + | |||
| + | If you are using IE and you would like WebScarab to automatically update your proxy settings for you, you need to complete the following steps. '''Note:''' This only works with the -installer version of WebScarab! | ||
| + | |||
| + | * Change to the Full-Featured interface (Tools -> Use Full-featured Interface), then go to the Proxy->Listeners tab. | ||
| + | * Select the only listener showing, and click "Stop". | ||
| + | * About 2/3 of the way down the screen are several input fields, corresponding to the columns in the listener table. | ||
| + | * Each box should be filled in with the value from the most recently stopped proxy. | ||
| + | * At this point, you can check the "Primary" checkbox, and then click "Start". | ||
| + | |||
| + | Your IE proxy settings will automatically be updated to point to WebScarab, and will be reset when you exit WebScarab. This setting will be saved, and used on subsequent runs of WebScarab. | ||
[[Category:How To]] | [[Category:How To]] | ||
[[Category:OWASP WebScarab Project]] | [[Category:OWASP WebScarab Project]] | ||
Latest revision as of 03:15, 15 August 2014
This page contains content that is outdated and is no longer being maintained. It is provided as a courtesy for individuals who are still using these technologies. This page may contain URLs that were once valid but may now link to sites or pages that no longer exist.
Please use the newer Edition(s) like OWASP Zed Attack Proxy Project
WebScarab has a large amount of functionality, and as such can be quite intimidating to the new user. But, for the simplest case, intercepting and modifying requests and responses between a browser and HTTP/S server, there is not a lot that needs to be learned.
Initially, I will assume that you have full unrestricted access to the Internet (that is, you are not behind a proxy). For the sake of simplicity, I will also assume that you are using Internet Explorer. If you need to use a proxy to get out of your corporate network, , see Chaining WebScarab onto another proxy
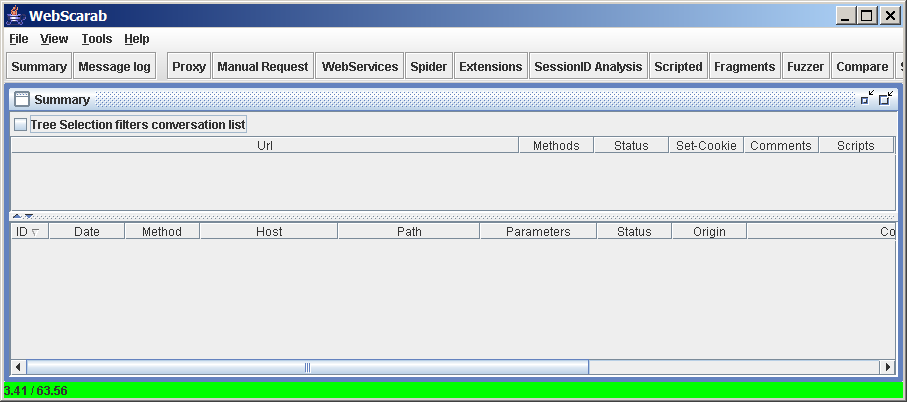
This is what WebScarab looks like at startup. There are a few major areas that might need explanation.
Firstly, the toolbar provides access to the various plugins, as well as the Summary window (main view), and messages (log) window.
The Summary window is split into two parts. On the top is a tree table which will show the layout of the sites that you have visited, and some attributes of the various URLs. Below that is a table showing all of the conversations that have been seen by WebScarab, normally sorted in reverse by ID, so that more recent conversations are at the top of the table. The sort order can be changed by clicking in the column headers if desired.
In order to start using WebScarab as a proxy, you need to configure your browser to use WebScarab as a proxy. This is configured in IE using the Tools menu. Select Tools -> Internet Options -> Connections -> LAN Settings to get the proxy configuration dialog.
WebScarab defaults to using port 8008 on localhost for its proxy. You need to configure IE to relay requests to WebScarab, rather than fetching them itself, as shown in the above image. Make sure that all checkboxes are unchecked, except for "Use a proxy server". Once you have configured IE to use the proxy, select Ok on all dialogs to get back to the browser. Browse to a non-SSL website, and then switch to WebScarab.
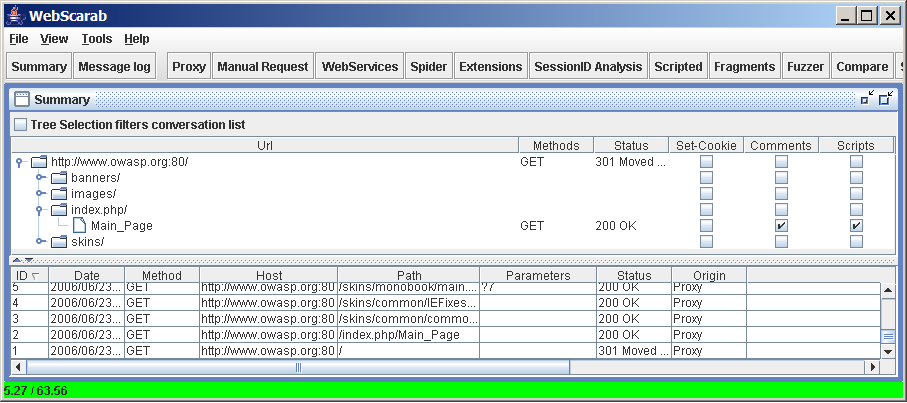
You should see something similar to the next image. If you don't, or you get an error while browsing, you should go back and check your proxy settings in Internet Explorer as described above. If the proxy settings are correct, one possibility is that there is already another program that is using port 8008, and preventing WebScarab from using it. If so, you should stop that other program. I will also show you how to tell WebScarab how to use a different port a bit later.
NOTE: If you are using WebScarab to test a site that is running the same computer as the browser (i.e. localhost or 127.0.0.1), and you are using IE7, you will need to add a dot "." after the hostname to force IE7 to use the proxy that you have configured. This is NOT a bug in WebScarab, but an unfortunate design decision (I assume) made by the developers of IE. Basically, it will ignore any proxy settings if it thinks that the server you are trying to reach is on the local machine. One way of tricking it is to add the dot, as in http://localhost./WebGoat/attack. This will force IE to use your configured proxy.
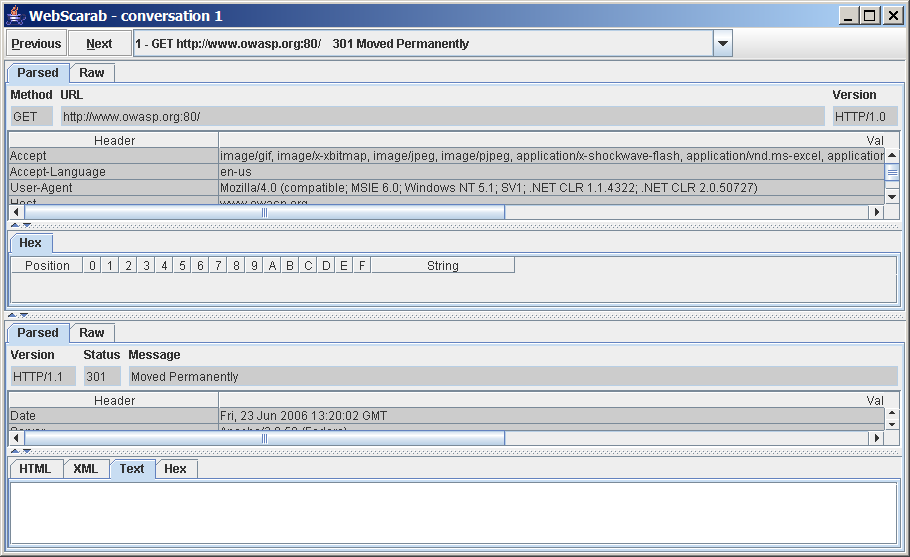
Here you can see the tree of URL's, which represents the site layout, as well as the individual conversations that have passed through WebScarab. To see the details of a particular conversation, you can double-click on a row in the table, and a window showing the request and the details of the response will open. You can see the request and response in a variety of forms. The view shown here is the "Parsed" view, where the headers are broken out into a table, and the request or response content is presented according to its Content-Type header. You can also choose the "Raw" format, where the request or response is presented exactly as it would be seen on the wire.
You can step from one conversation (request/response) to the next in the conversation window using the "previous" and "next" buttons, as well as jumping directly to a particular conversation using the drop down combo box.
Now that you are familiar with the basic workings of WebScarab, and have made sure that your browser is correctly configured, the next step is to intercept some requests, and modify them before they are sent to the server.
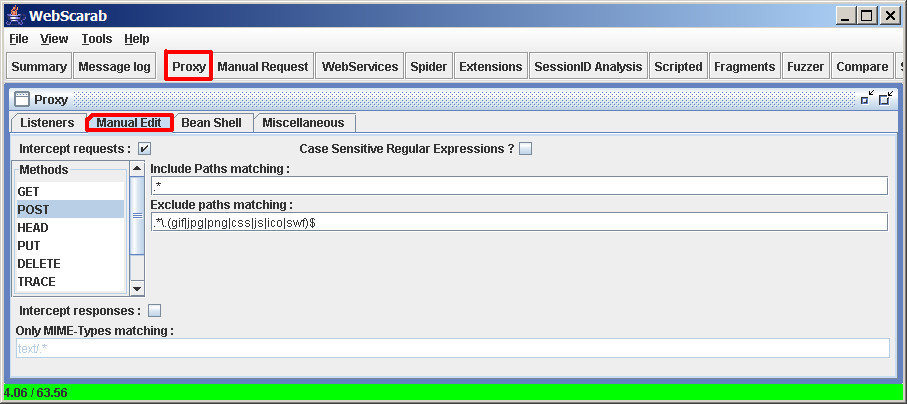
You enable proxy intercepts via the Proxy plugin, accessible via the "Proxy" button on the toolbar. Then choose the "Manual Edit" tab. Once you click the "Intercept Requests" checkbox, you can choose which request methods you wish to intercept (most commonly GET or POST), and can even choose multiple methods using "Ctrl-click". Select "GET" for the moment.
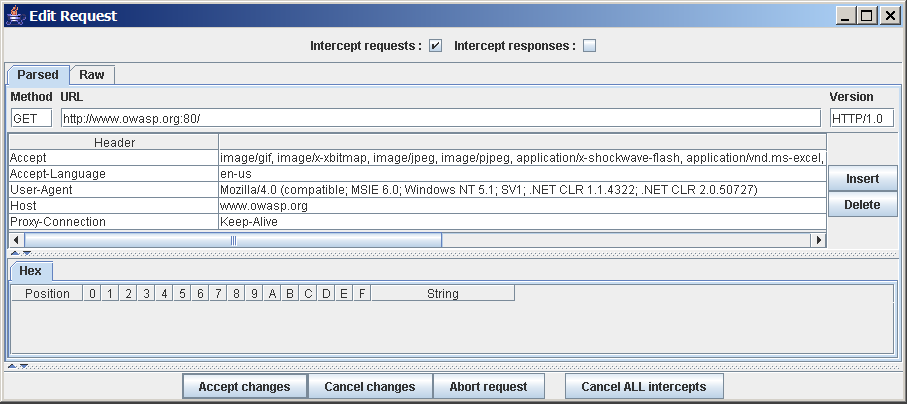
Now go back to your browser, and click on a link. You should see something like the following window appear (it may only flash in the task bar initially, just select it. Future windows will pop-up properly).
You can now edit any part of the request you choose. Note that the headers are shown already URL-decoded, and anything that you type in will be URL-encoded automatically. If you do not want this to happen, you should use the Raw mode. In some cases, using the Raw mode may be the easiest anyway, especially if you have something that you wish to paste in.
Once you are happy with your changes, click on the "Accept changes" button to allow the modified request to be sent to the server. If you decide that you wish to revert the changes that you have made so far, you can click on the "Cancel changes" button to allow the original request to be sent to the server. You can also click on the "Abort request" button if you don't want to send a request to the server at all. This will send an error back to the browser. Finally, if there are multiple intercept windows opened (e.g the browser is using several threads simultaneously), you can release all the requests using the "Cancel ALL intercepts" button.
WebScarab will continue to intercept all requests that match the method you specified until you uncheck the "Intercept requests" checkbox, either in the intercept conversation window, or in the "Manual Edit" tab of the Proxy plugin. But you may be wondering why WebScarab does not intercept requests for images, stylesheets, javascript, etc. If you go back to the "Manual Edit" tab, you will see a field labeled "Exclude paths matching:". This field contains a regular expression which is matched against the request URL. If there is a match, the request is never intercepted.
You can also configure WebScarab to intercept responses, in case you want to change the behaviour of some parts of the page. For example, you can disable JavaScript validation, change the list of possible items in a SELECT field, etc.
Tips and tricks
If you are using IE and you would like WebScarab to automatically update your proxy settings for you, you need to complete the following steps. Note: This only works with the -installer version of WebScarab!
- Change to the Full-Featured interface (Tools -> Use Full-featured Interface), then go to the Proxy->Listeners tab.
- Select the only listener showing, and click "Stop".
- About 2/3 of the way down the screen are several input fields, corresponding to the columns in the listener table.
- Each box should be filled in with the value from the most recently stopped proxy.
- At this point, you can check the "Primary" checkbox, and then click "Start".
Your IE proxy settings will automatically be updated to point to WebScarab, and will be reset when you exit WebScarab. This setting will be saved, and used on subsequent runs of WebScarab.
